
When I got home from the Ann Arbor Hands-On Museum on Saturday, I called up my friend Mark, W8MP. I wanted to tell him about my contact with OG3077F, a Finn who has successfully worked all 3,077 U.S. counties. As it turned out, Mark has worked him several times. I should have suspected this. Mark seems to know everyone.
As we continued our conversation, he mentioned that one of his son’s friends had put up an antenna and that they were going over there to help him tune it up that afternoon, and he asked if I’d like to join them. Mark’s son, Brian, is KD8EEH, and his friend, Alec, is KD8RGP. To be honest, I was a little hesitant. I was kind of tired after walking home from the museum, but Mark twisted my arm a little, so I agreed to head over there.
On the phone, Mark suggested that I might want to bring over some coax and some other kinds of antenna-making stuff, so that if we needed to make modifications, we’d have the wherewithal to do it. So, I loaded my crate of antenna parts, my toolbox, my 100-ft. tape measure, and a spool of coax into my Mini.
When I got there, I found that Alec was way ahead of us. He actually had already set up a 20m dipole. One end was suspended from an old, now unused power pole at the back of Alec’s backyard. The other was suspended by a rope draped over a downspout.
The construction was actually quite ingenious. For the center insulator, Alec had drilled some holes in a small block of wood that provided both strain relief for the wires and a way to mount an SO-239 connector. I wish I’d taken a picture of it. The end insulators were made from some scrap plastic.
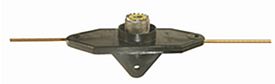
Ingenious though it was, I suggested that we might wan to rebuild the antenna with an HQ-1 center insulator (right) to make it more reliable. While we were at it, I also suggested that we use a set of HQ-2 insulators for the ends. Mark got the boys working on disassembling the current antenna and rebuilding it with the new insulators, and in a short time, it was back up in the air.
Because Alec had already routed the coax down to the basement, we all tromped down there to see how well it tuned. Yipes! It looked to be way long. So, we lowered it, shortened each side by six inches and tromped back down stairs. We were closer this time, but it still needed to be shorter, especially since we were tuning this for the phone portion of the band. We shortened it by another six inches, and bingo, this time we got a nice dip right around 14.25 MHz.
Flush with success, someone suggested that we might want to add 40m elements to the dipole. This sounded like a good idea to me, and I told them about the 30m/40m dipole that I have. After a little discussion about whether to use feet or meters to calculate antenna length (we decided on inches as my tape measure is ruled in feet and inches), Alec started scrounging around for some wire.
At first this looked like it was going to be a problem. There was one 28-ft. length, and a couple of other odd lengths, but it wasn’t clear that we were going to be able to make two, 33.5-ft. lengths from the pieces we had. We finally did figure it out, though, and the antenna was lowered, and Alec attached these elements to the center insulator.
As it turned out, there were some convenient supports for these elements that allowed this dipole to be oriented nearly perpendicular to the 20m dipole. On one end, the boys used a tree, and at the other end, the wire was draped over another a downspout on the opposite side of the house.
We again tromped downstairs to check the resonance. Again, we were quite long. We lowered the antenna and shortened it by six inches on each end, then measured again. This time, the resonant point was just below 7 MHz. This time, we shortened the antenna by nine inches on each side, and the resonant point was just about in the middle of the General Class portion of the 40m phone band.
Of course, the proof of the pudding is in the eating, so we told Alec to get on the radio and see if we could make any contacts. Tuning around, Alec found a few stations working the Missouri QSO Party. He called a couple of them, and worked them on the first call.
At that, we called our efforts a success, and went upstairs to eat some take-out curry that Alec’s parents had gotten for us. Over dinner, we all patted ourselves on the back. I’m sure that Alec is in for a lot of fun on 20m and 40m.
My antenna is similar, but a bit fancier. One element is a 40m dipole, the other is a 20/80 trapped dipole that is almost exactly the same length. The traps load the antenn for 80m and isolate the center section as a full-sized 20m dipole.
Because of the traps, I got a commercial version from Hy-Power. It is very solidly constructed. http://www.hypowerantenna.com/products/fan-dipole
Nice job Dan. But by the end I thought you were going to say the first station he worked was OG3077F!
73, Jeff
Great story! The Budwig center insulators are certainly popular, but I’ve heard of mechanical failures. I make something similar out of a piece of 1/4-inch thick G-10 Garolite (basically very thick PCB material) and use miniature shackles for mechanical interface, bolts/lugs for the electrical. Total cost is about the same as the Budwig, but it’s virtually indestructible.
Mechanical failures? I’ve never had a failure, nor have I ever heard of one. I think it would take quite a high force to break one of those things.
Yeah, one of the guys in PVRC replaces his periodically. Maybe he’s using wire that’s too big (heavy) or over a really long span? Might have a lot of swaying from trees also. I think it’s for a 40-m delta loop.