
I often say that getting an amateur radio license is as much getting a license to learn as it is getting a license to operate on the amateur radio bands. Lately, I’ve been learning about batteries, LiPo batteries to be exact.
It all started when I purchased a Morserino. The Morserino is a feature-packed Morse Code learning aid. In addition to helping you learn the characters, it’s also supposed to help you learn how to copy in your head. It has a built-in touch keyer function, and a LoRa interface that lets you send and receive code from other Morserino units.
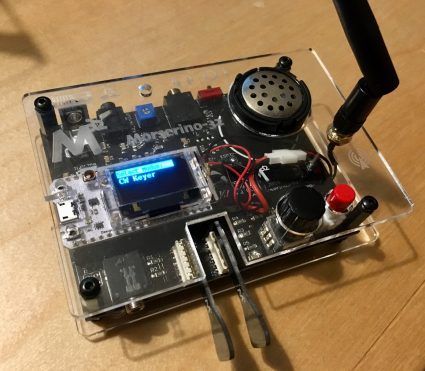
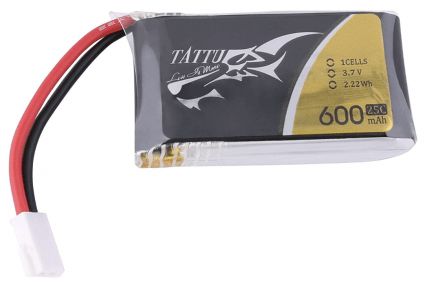
I’ll be writing more about the Morserino in a future blog post, but let’s get back to batteries. The kit did not come with a battery. Instead, it was suggested that one purchase a 600 mAh LiPo battery commonly used for powering drones. I found this battery on Amazon, and purchased a six pack of them, thinking that I’d find uses for the other five in some project or another.
Well, sooner than expected, I did find another application for one of the batteries. I’m building a little Arduino project for a client, and I reckon that this, or one with more capacity, will make a great power source for the project.
Now, I have two immediate challenges:
- Figure out how to charge the battery.
- Figure out how to connect it to the Arduino.
On the Morserino, the battery plugs directly into a connector on the bottom of the computer board (the white board with the LED display). I knew that connecting the 5V line from the USB connector directly to the battery was a no-no, but I’d lent out the Morserino to a friend, and I didn’t have the schematics for the board. So, how they managed to charge the battery from the USB port was a bit of a mystery.
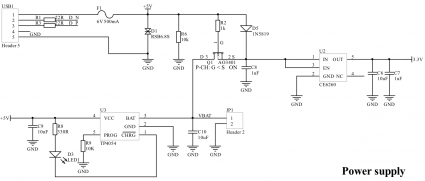
I emailed Willi, OE1WKL, the designer of the Morserino, and he sent me a wealth of information. There actually is a battery-management IC, the TP4054, on the board:
He also gave me the part number for the battery’s mating connector. He said, “The mating connector for the Molex connector on the battery is a Molex 51006. It is sometimes referred to by vendors as 51005 female, but 51005 is the connector on the battery.” You can, of course,buy pre-made cable assemblies on Amazon.
You can also buy lithium battery charging modules. These modules have a TP4056 on them, which is similar to the TP4054. It’s amazing to me that you can purchase ten of these things for less than seven bucks.
So, that’s where I’m at right now. Once I get the modules and cables, I’m going to hook it all up and get the Arduino system running from the battery. The next step will be to integrate a small solar panel and run the whole thing from solar power, hopefully.
Funny, I was just researching a 12V -> 5V supply for my QRPLabs kits (station clock and ultimate U3S WSPR xmtr). Both of these run off of 5V, but I’d like to run station 12V to the cases and convert to 5V inside, to avoid the fatal mistake of accidentally hooking up the case 5V input to 12V someday.
Bonus points for having a Li-ion or Li-poly 3.7V battery on charge inside the case (especially the clock). Adafruit have buck/boost supplies for about $10 plus a battery, but I’m wondering about RF interference from the little switcher supplies, etc.
Any ideas, experience?
Sorry. I haven’t tried those buck/boost supplies. If you do give it a go, let me know.