
I’ve updated my WTH card, a card that I can give out to folks when I’m doing a POTA or lighthouse activation that tells them what the heck I’m doing.
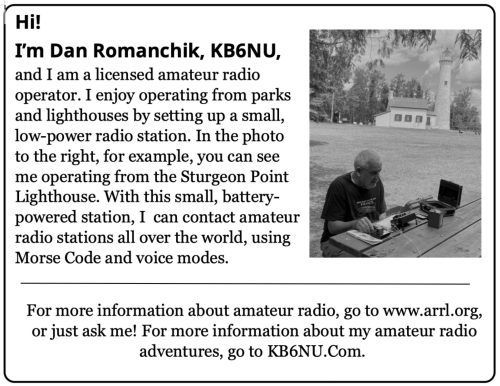
What do you think? One thing that I’m having trouble with is getting the black-and-white photo to look good. I started with a 300 ppi color image, but I must have done something bad in turning it into a b/w image. Any ideas would be appreciated.
Super idea!!! and thanks for the embedded link with more examples. I really appreciate your blog Dan.
If you ever shot BW film, you might remember that there is not just one way to convert the color image in front of the camera into a BW image. It all depended on the film, the filters and of course how you process both film and the prints. The same holds still true when it comes to digital images that you want to convert to BW. The best way to do that is to not let some software do the conversion automatically – which is what happens when you print a color image to a BW printer. Try to do the conversion manually. How that is done depends on the software you are using. Ideally, you would have full control over how the color channels would be represented in the BW image. de K5KHK
I converted the color image to black-and-white using Graphic Converter, an image-processing program that I’ve used for many years. The image itself looks pretty good, I think. Now that I think about it more, I think that the problem is that I’m letting the Libre Office word-processing program resize the image. I’ll have to use Graphic Converter to make the image the exact size that I need.
Thus is great work, Dan!
Try some phone or tablet hotmail apps. I’m experienced in PS and Gimp enhancing pics but often my iPad or iPhone photo editing apps just do a better and automated job (relative to desktop apps)..
If you choose to laminate, consider a fitted image of your FCC license on the back.
73,
Frank
K4FMH
I actually used Graphic Converter, an image-processing program for the Mac, to create the image. The image itself is actually not so bad. I think that the problem is that I’m letting the word-processing program resize that image.
Interesting idea about including an image of my license. These are supposed to be handouts, though. I suppose that I could simply print an image on the backside.
Just a small item. You might level the horizon so the light doesn’t look like it is falling over.
I’m glad to do some processing on that image for you. GraphicConverter is great, but I can do more in Lightroom. Send me the color photo. I’ll straighten it crop a bit and make the B&W look better.
The issues with the image are size, lighting, and framing. As a large image (see original) it’s ok but as a smaller printed image these issues really dominate.
The lighting on you is poor. Your face, body, and the radio components are essentially black compared to the lighthouse. While you do want contract, and you do want your main focus to “pop” and be the main focus, the difference is too large.
The framing of the image isn’t bad, but you essentially have two photographs, one on top of the other, with grass in between, the subjects are both present, but don’t interact in any meaningful way.
You can’t go back in time and reframe the photo, but you might want to look at your other photos and see if you have one better suited to the size and cropping requirements of your handout.
What I’d suggest is the following, described as differences from how this photo was taken (and no, I’m no photographer, so take this with a large grain of salt)
1. Lower the camera – try to get the lighthouse to the right of your head, perhaps with your head overlapping the main building somewhat. If having the base of the lighthouse in view is important, have it appear between the radio and your arm – just above the case on the bench.
2. Light your face more. While you need contrast between your face and whatever background it’s on (in my suggested case, the lighthouse building), you also need contrast between your face and your shirt and other surrounding objects. This can be accomplished with a fill in flash. Your shirt is already dark, so the fill flash would work fine and still provide good contrast between your shirt and face.
3. Take the photo from further away. Once you put the lighthouse and yourself closer together in the frame, the lens distortion that makes the lighthouse appear to be tilting will be reduced, but will still be present. Taking the photo from further away and using more zoom will reduce it further.
You can also do all this digitally with your current image – cut your foreground (self, table, equipment) out, increase the brightness of your head and arms to halfway between your shirt’s level and the main building’s side, and overlap your foreground over the lighthouse and building. Rotate the background a little to straighten the horizon. Keep the overhead greenery so the shadow differences between your foreground and background are still explained in the image. Remove and replace the antenna line.
Not only does it allow you to have a larger face and lighthouse in the smaller image, but it should provide the contrast needed to make it all work together in one image, drawing the eye to the various important parts of the image.
Of course, some are uncomfortable with photoshopped images, and if that’s the case then perhaps just a slight alteration of the curves would be ok to make your face stand out from your clothing and kit. Otherwise you should really look for another image that looks better in the smaller format, or take new photos with this particular usage in mind so you can get a better photo to use next time around.