
I’m not one of those guys who just has to have the latest gear. In fact, the last “big rig” that I purchased was my IC-746PRO back in 2005. I made tens of thousands of QSOs with that radio, and in all that time, the only problem I ever had was with the automatic antenna tuner. And even that turned out to be a non-problem. The ICOM tech said he didn’t find any fault with the radio, but added all of the hardware updates while he had it in the shop.
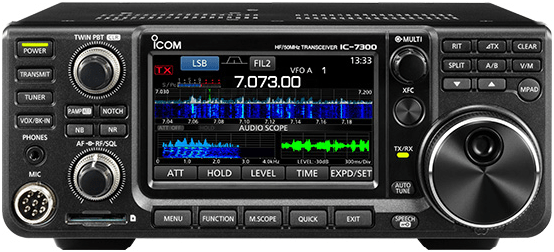
So, it was with a little trepidation that I finally pulled the trigger on the purchase of a new radio—an ICOM IC-7300. I purchased this radio from a friend of mine who was upgrading to an IC-7610. He gave me a very good deal on the radio. (Thanks, Sam!)
Now, I’d like to give you some of my impressions about the radio….
Flashy display
The first thing you notice about the IC-7300 is the flashy touch screen display. I may be wrong, but I think this is the first radio with a built-in spectrum scope in this price range.
I really like this display. It just gives you so much information about what’s going on on the band. You can see where other stations are transmitting, and because it’s a touch screen, you can easily change frequencies by simply tapping the screen. I’ve already made several QSOs by quickly finding stations calling CQ. How’s that, you ask? Well, you can see their transmission, and if you don’t see a station transmitting on their frequency immediately after they stop, you can guess that they’re calling CQ.
The screen on the radio above is showing the bandscope and waterfall, plus the “audio scope.” The radio audio scope displays the received signal’s frequency components on the FFT scope (left), and a real time waveform on the oscilloscope (right). The FFT scope also has an waterfall. I guess that this is useful if you operate SSB, but since I don’t, I really haven’t tried this yet.
Instead, I set up my screen to display meters, as shown below. In this mode, the screen shows the bandscope, waterfall, and a variety of meters, including ALC, compression level (COMP), SWR, the drain voltage of the final amp MOSFETs (ID), the drain voltage of the final amp MOSFETs (VD), and the temperature of the final amp MOSFETs (TEMP).
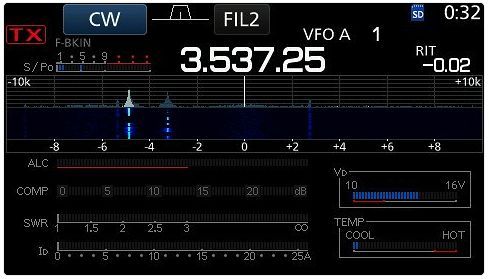
This may be a little too much information. While I suppose that it’s nice to know how much current the rig draws when transmitting, it was, at first, a little disconcerting to see VD drop a volt or so. This does, of course happen with other rigs—at 15 A, it only takes a lead resistance of 67 mΩ to drop VD a volt—but you never see that.
Using the touch screen is easy enough when you get used to it, too. To change the frequency, you simply touch the frequency display and a band-change menu pops up. To change the operating mode, you touch the displayed mode, and a mode menu pops up. Changing the filter bandwidth, you touch the filter display.
This all works pretty much the same way that my IC-746PRO works, except that instead of pushing buttons on the radio’s front panel, you’re touching the touch screen. I like the fact that the operation is so similar to my IC-746PRO. It made it much easier to learn how to operate the new radio.
I can really think of only one negative at this point, namely the screen is a little on the small side. Of course, I don’t know that you can expect much more from a $1,200 radio. The new ICOM IC-7610 has a bigger screen, but it costs three times as much!
That’s all for part 1. In upcoming posts, I’ll review the other aspects of the radio, including receiver performance, the digital signal processing, and the USB port . If you have any questions, please comment below, and I’ll try to answer them for you.
Congratulations Dan! I hear a lot of 7300’s on the air, and they always seem to have a good clean signal on PSK-31. I think you’re going to love this radio.
I’ve had mine for about a year (early adopter!). Check out the “band-stacking” capabilities…
I set up my three most frequently used “modes” on each major band. So if you hit the MHz on the display and select 7, it goes to the most recent mode you’ve set up on 40 meters. If you hit MHz again and hit 7 again, you can set that up for a different mode. Pressing and holding the 40m will keep it on that screen, but change to the next setting. Mine are basically configured for SSB, CW, and SSB-Data mode. It really makes changing modes a snap because my filters etc are already preset.
Thanks for pointing that out, John. I failed to mention it because my IC-746PRO works exactly the same way, and I guess that I just took it for granted. I have the bands set up exactly as you do: one setting for CW, one for digital, one for phone.
One of the things I immediately appreciated when I started using waterfall displays was the ability to find CQing stations easily. I marveled at just how many stations were calling CQ, because in the past it was easy to miss them by just randomly tuning across the band. My rig at the time was an Elecraft K3, with Larry N8LP’s LP-PAN panoramic adapter. The LP-PAN can be built to work with practically any rig’s IF output (and if it doesn’t have one, you can usually add one yourself). Later, when Elecraft released the P3, I went to that to free up my laptop display. The P3 also has an option to drive a large LCD external monitor with a higher-resolution FPGA, so on the large display I get up to 200 KHz bandwidth, with a two minute waterfall at up to 1600 x 1200 resolution. Loads of fun!
Once you’ve gone to using a waterfall display, you wonder how you ever did without it.
On the subject of voltage droop, it’s a wonder that any 100W RF power amplifier operates cleanly with only a 12V supply. It takes a lot of current to get 100W output out of something with only 12V. That’s why higher power amplifiers (500W+) tend use a 50V or higher dedicated supply. It’s a lot easier to produce clean power if you start with higher voltage supply.