
 As I wrote yesterday, the main feature of the new ICOM IC-7300 is the flashy touchscreen display. They’ve done some clever things with the other controls, too. For some functions, the designers use the touchscreen to reduce the number of knobs and buttons on the radio’s front panel.
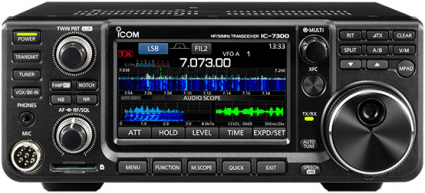
For example, the IC-746PRO had an RIT/XIT control that you used to set the offset frequency, and a bunch of smaller controls that were used to set the mic gain, CW speed, CW sidetone frequency, and RF output level. They’ve combined all of those functions into a single MULTI control, which is located just outside the upper right-hand corner of the touchscreen.
You press that control, and depending on what mode you’re in, some options pop up on the touch screen. In CW mode, for example, you can select RF output, key speed, and CW sidetone frequency. Tapping selects one of the options, and rotating the knob changes the setting.
This process is all digital, too, meaning that you can more accurately set these parameters. For example, when you set the RF POWER level on the IC-746PRO, you never knew what it was set to, until you actually transmitted, and then, you had to re-adjust, if it wasn’t what you wanted. On the IC-7300, you can set it to 25% or 80% right off the bat. The same goes for CW speed and CW sidetone frequency.
Like I mentioned, the options for the MULTI control change depending on what mode you have the rig set to. If you’re operating SSB, the options are RF POWER, MIC GAIN, COMP (compression, on/off), and MONITOR (on/off). In RTTY mode, the options are RF POWER, TPF (twin peak filter, on/off), and MONITOR (on/off). You also use the MULTI control to set the parameters of the notch filter, noise blanker, noise reducer, VOX, and break-in.
And, in addition to all that, you use the MULTI control to set the RIT and XIT. Setting these increments works exactly the same as on the IC-746PRO.
The designers also made good use of the touch screen for changing bands and direct frequency input. The IC-746PRO had a keypad that provided both of those functions. Each key had both a frequency (1.8, 3.5, 7, etc.) and a number (0,1,2,3,etc.). To change bands, you simply had to touch the right button. For example, to switch to the 40m band, you tapped the 7 (MHz)/3 button.
When you wanted to directly input a frequency, you first touch the F ENT button and then typed in the frequency. I had that radio for more than 12 years, but I still got confused by that. I would often want to enter a frequency of 7.030.00, and more often than not, I’d hit the 7 MHz/3 button without thinking and then have to do it all over again.
I can’t make that mistake on the IC-7300. To change bands or directly input a frequency, you first touch the MHz portion of the frequency display. When you do that, a keyboard pops up on the screen with keys labelled with the frequency bands. You can then touch one of the buttons to change bands, or if you want to directly enter a frequency, you touch the F ENT button on the screen. When you do this the buttons change to a numerical keypad and you enter the frequency directly. This works great!
Another user-interface features worth mentioning is that the headphone jack is a 1/8-in. jack, not a 1/4-in. jack. I happen to like that because I’m using an old computer headset with a 1/8-in. plug. If you have a set of headphones with a 1/4-in. plug, you’re going to have to get an adapter.
On a lot of rigs, the lack of knobs and buttons makes the radio more difficult to use because you have to wade through a lot of menus to get to the functions you want. While this is somewhat true of the IC-7300 when compared to the IC-746PRO, it doesn’t really seem to be that much more difficult. I think the designers really put a lot of thought into how to make the functions as accessible as possible while cutting down on the number of knobs and buttons.