
As I mentioned before, one of the reasons I bought the N0XAS PicoKeyer is that it had an MCW mode. In this mode, the RIG output instead of keying a CW transmitter is connected to the PTT input of a VHF/UHF rig to key it. This signal goes low once you start sending and stays low for two word spaces after you stop sending. The audio of the keyer is fed into the microphone input, and it’s this signal that’s actually turned on and off.
Of course, just because the keyer has this capability, doesn’t mean it’s actually easy to implement. For one thing, the keyer iself has no way to connect its audio to an external device. And while the key output (RIG signal) is available via a 1/4-in. phone plug, that’s not necessarily the easiest way to connect it to your rig. Another gotcha is that the audio output level is not necessarily the right level for your radio, either.
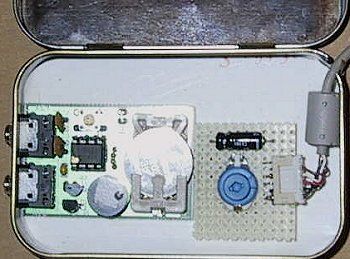
What I did was to cut a piece of perfboard, and mount the components I needed to that board. As you can see in the photo below, the board has a capacitor for decoupling, and a pot to adjust the audio level. To the right of the pot, is a small connector, to which the cable going to the VHF rig connects. Below the photo of the assembly is a schematic.
I Like Mice
There’s a cool story behind this connector and the cable. I’m using an Icom IC-207H in my shack. The data connector for this rig is a six-pin mini-DIN plug, exactly the kind of connector used for PC mice. On a club net, I asked if anyone might have a dead mouse they would be willing to part with for this project, and one guy, who works in PC support for a large university, volunteered that he had quite a few of them.
I was prepared to simply snip off the cable and solder the wires directly to the board, but when I dissassembled the mouse, I found that the cable connected to the board via the little header. I unsoldered it from the mouse PCB and super-glued it to the perfboard. the best part is that I didn’t have to fool around with stripping, tinning, and soldering those little wires in the cable.
As I noted earlier, the Pico Keyer does not have pads to easily connect the appropriate signals. What I did was to tack wires on to the bottom of the board and run them over to my MCW board. You can’t see these in the photo. It’s a little bit Mickey Mouse (pun intended), but it works OK.
Another Gotcha
After I built the board, I plugged the thing into my rig. This was kind of late Sunday night, but I was fortunate to find a club member monitoring the repeater on his way home from a weekend trip. I keyed it up, and asked him how it sounded. He said the tone was OK, but that it also sounded noisy. Looking at the power ouptut meter on the rig, it appeared as though the PTT line wasn’t working quite right. I hooked up the scope, and sure enough, that line was not being held constantly low. The result was that the keyer was rapidly keying and unkeying the radio.
The next day I swapped some e-mail with N0XAS, who located the problem, and promised to send me a replacement chip ASAP. It arrived in the mail yesterday. I plugged it in,and it’s now working like a charm.
One thing I might want to add to this circuit is an RC low pass filter to make the output signal less of a square wave and more of a sine wave. The guy who listened to me playing with it yesterday didn’t have any complaints about the tone, though, so that’s not a high priority.
More ham radio stuff at Technorati.Com
I just ordered the Ultra Picokeyer for sending MCW thru our club 2 meter repeater.
How did you get the side tone from the keyer?